DKIM will be more and more important in the future for authenticating legitimate e-mails. For this reason, I like to enable DKIM for all my domains in Office 365 tenants where DKIM is really easy to enable.
In Exchange Online console we can find DKIM under Protection -> DKIM where we can usually see the option “Enable”.

I have seen a few cases where this option is not available and “No DKIM keys saved for this domain” is displayed instead.
What can we do in this case?

First, we need to connect to Exchange Online with PowerShell and run the following command:
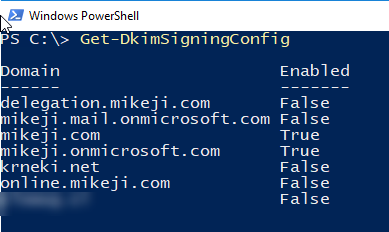
Get-DkimSigningConfigWe can see the domains that are enabled or can be enabled for DKIM in our tenant.
Next, we enable DKIM for our new domain by running:
New-DkimSigningConfig -DomainName <yourdomain.com> -Enabled $True
If you haven’t added the required DKIM DNS records you will receive a warning that necessary DNS records are missing, but the domain will be added to the DKIM signing configuration and can be enabled in the Exchange Online Console once the records are added.


What does a DKIM DNS record actually look like?
Every domain has its own specific record information and it will be displayed either in PowerShell (as we have seen above) or when you click Enable option under DKIM in the Exchange Online console.
For my domain it is:
CNAME selector1._domainkey.telnet.si -> selector1-telnet-si._domainkey.mikeji.onmicrosoft.com.and
CNAME selector2._domainkey.telnet.si -> selector2-telnet-si._domainkey.mikeji.onmicrosoft.com.
How can we check if DKIM is now enabled for our domain? We can for example send ourselves an e-mail. For example, I e-mailed myself from @telnet.si to my Gmail account and checked the headers of the message.
In the header we should see a DKIM signature and in the signature, there should be a d for the domain part. Next to it should be your domain for which you just enabled DKIM signatures.
